बहुत से नए business owners और freelancers के मन में एक ही सवाल होता है: "GST registration के लिए CA hire करना पड़ेगा क्या? और उसमें कितना खर्च होगा?"
सच यह है कि GST registration एक ऐसा काम है जो आप खुद घर बैठकर कर सकते हैं, बिना किसी CA की मदद के, और सबसे ज़रूरी बात, बिना एक रुपया government fee दिए। GST Registration online पूरी तरह free है।
जो लोग इसे complicated मानकर avoid करते हैं या किसी agent को ₹1,500-5,000 देकर करवाते हैं, वो जानते नहीं कि process कितनी straightforward है। इस article में हम पूरी journey step-by-step cover करेंगे: किसे register करना है, कब करना है, कौन से documents चाहिए, और registration के बाद क्या करना है।
GST Registration किसके लिए ज़रूरी है और कब?
पहले यह समझ लेते हैं कि GST registration mandatory कब होता है, क्योंकि यह सबसे common confusion है।
Threshold limit: Services के लिए
अगर आप services provide करते हैं, जैसे software development, consulting, designing, freelance writing, digital marketing, coaching, तो आपको GST registration तब ज़रूरी है जब आपका annual aggregate turnover ₹20 लाख से ज़्यादा हो जाए। Special category states जैसे Manipur, Mizoram, Nagaland, Tripura में यह limit ₹10 लाख है।
Goods बेचने वालों के लिए
अगर आप goods (products) बेचते हैं, तो ज़्यादातर states में limit ₹40 लाख है। लेकिन अगर आप mixed business करते हैं, यानी goods और services दोनों, तो आप पर service वाली ₹20 लाख की limit ही apply होगी।
कुछ cases में limit से नीचे भी registration mandatory है:
यहाँ एक बात बहुत important है जो बहुत लोग miss कर देते हैं। चाहे आपका turnover कितना भी कम हो, इन situations में GST registration ज़रूरी है:
अगर आप एक state से दूसरे state में goods या services sell करते हैं (inter-state supply), तो registration mandatory है, बिना किसी turnover limit के।
अगर आप Amazon, Flipkart, Meesho जैसे e-commerce platforms पर sell करते हैं, तो registration ज़रूरी है।
अगर आप foreign clients को services export करते हैं, तो voluntary registration आपके लिए बेहद फायदेमंद है।
Voluntary registration क्यों करें?
अब बात ये है कि limit से नीचे होने पर भी registration करवाना समझदारी हो सकती है। क्यों?
B2B clients, corporations, और बड़ी companies unregistered vendors से काम नहीं करतीं क्योंकि वो input tax credit (ITC) claim नहीं कर सकतीं। अगर आप एक software agency चला रहे हैं या freelancer हैं जो enterprise clients से deal करना चाहते हैं, तो GST registration आपकी professional credibility बढ़ाता है। इसके अलावा, आप जो भी business expenses करते हैं, जैसे laptop, software subscription, internet, office rent, उन पर जो GST pay करते हैं उसे input tax credit के तौर पर reclaim कर सकते हैं।
Documents की Complete List: पहले यह तैयार करें
Application शुरू करने से पहले सभी documents एक जगह तैयार रखें। इससे process smooth रहेगी और portal पर बार-बार session expire होने की परेशानी से बचेंगे।
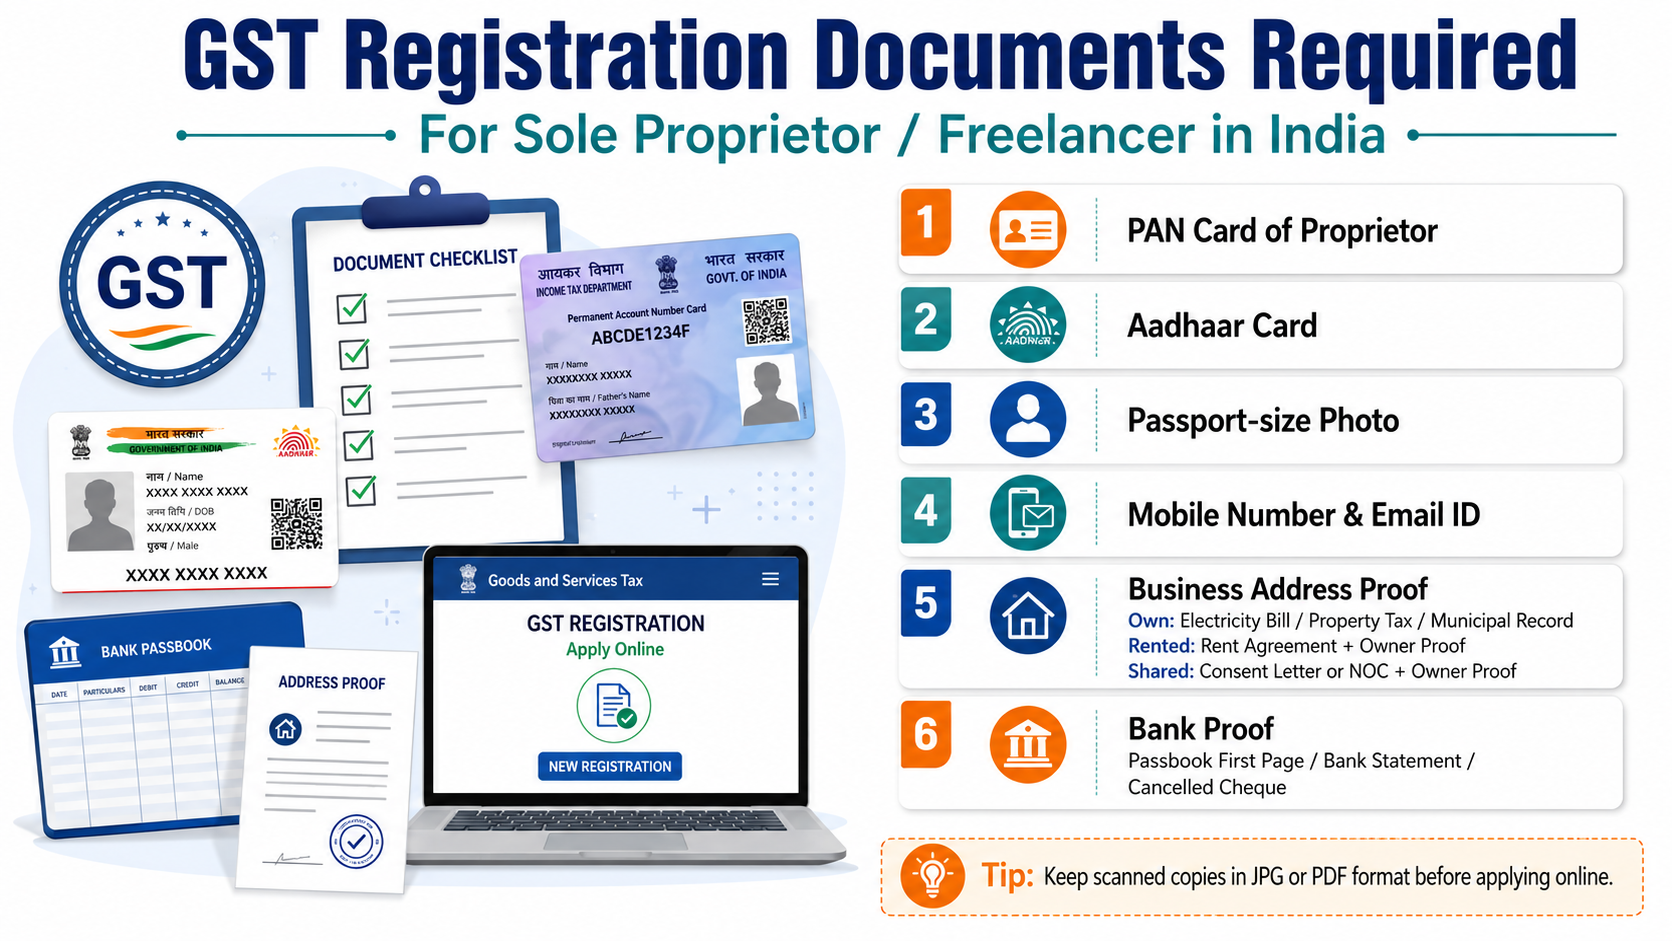
Sole Proprietor या Freelancer के लिए:
पहला, PAN Card। यह mandatory है। Proprietor का individual PAN card चाहिए। Business का अलग PAN नहीं होता sole proprietorship में।
दूसरा, Aadhaar Card। 2025 में Aadhaar authentication mandatory हो गई है। जो mobile number आपके Aadhaar से linked है वो active होना चाहिए, क्योंकि OTP उसी पर आएगा।
तीसरा, Passport-size Photograph। JPEG format में, maximum 100 KB size। Recent photo, white background preferred।
चौथा, Business Address Proof। यह सबसे common confusion वाला document है। इसके options हैं:
अगर office rented है: Rent Agreement और landlord का NOC (No Objection Certificate)
अगर office owned है: Property tax receipt या electricity bill property owner के नाम पर
अगर home-based business है: खुद के घर की latest electricity bill या property document
अगर shared office या coworking space use कर रहे हैं: उस space का consent letter और उनका GST registration proof
पाँचवाँ, Bank Account Proof। Cancelled cheque जिस पर account number और IFSC clearly दिखे, या bank statement का पहला page जिस पर नाम, account number, और branch दिखे। ध्यान रखें कि bank statement/cheque पर जो नाम है वो PAN के नाम से match करना चाहिए।
छठा, Email ID और Mobile Number। यह GST portal पर OTP verification के लिए ज़रूरी है। Registration के बाद सभी government notices इन्हीं पर आएंगे।
Partnership Firm या LLP के लिए कुछ additional documents:
Partnership deed, LLP registration certificate, और सभी partners/designated partners का PAN और Aadhaar।
Private Limited Company के लिए:
Certificate of Incorporation, Memorandum और Articles of Association, Board Resolution for authorized signatory, और company का PAN।
Document format: सभी scanned copies PDF या JPEG में होनी चाहिए। हर file 100 KB से कम होनी चाहिए। बड़ी files को compress करें वरना upload नहीं होगा।
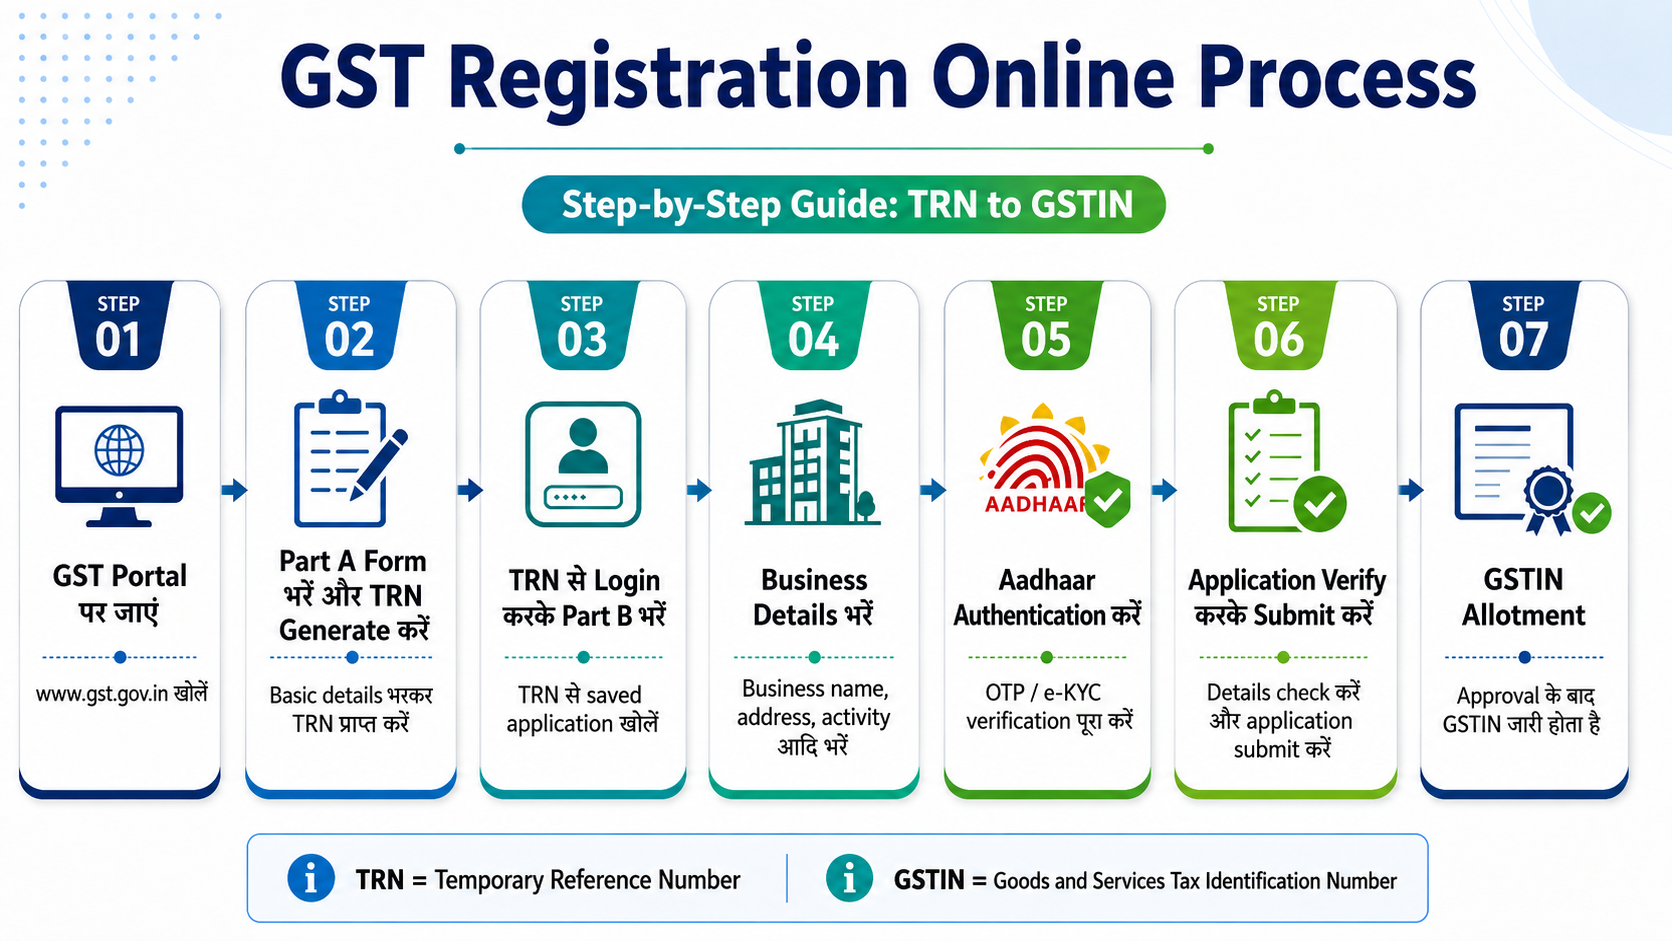
GST Registration का Step-by-Step Online Process
चलिए अब actual registration process शुरू करते हैं। इसे ध्यान से follow करें।
Step 1: GST Portal पर जाएं
अपने browser में gst.gov.in open करें। यह government का official portal है। ऊपर "Services" menu में जाएं और "Registration" पर click करें, फिर "New Registration" select करें।
Step 2: Part A Form भरें और TRN Generate करें
पहले आपको एक Temporary Reference Number (TRN) generate करना होगा। इसके लिए:
"I am a" dropdown में "Taxpayer" select करें। अपना state और district select करें। Business का legal name PAN के अनुसार भरें (exactly वैसे ही जैसा PAN पर है)। PAN number enter करें। Email ID और mobile number enter करें।
Email और mobile दोनों पर अलग-अलग OTP आएगा। दोनों OTP enter करके verify करें। Submit करने के बाद आपको एक TRN (Temporary Reference Number) मिलेगा। इसे कहीं note करके रख लें, यह अगले 15 दिनों के लिए valid रहेगा।
Step 3: TRN से Login करके Part B भरें
दोबारा portal पर जाएं। "Services" → "Registration" → "New Registration" में जाएं। इस बार "Temporary Reference Number (TRN)" option select करें और अपना TRN enter करें। OTP verify करने के बाद आप Part B में पहुँच जाएंगे।
Step 4: Business Details भरें
यहाँ आपको कई tabs में information fill करनी होगी:
Business Details tab में: Legal name of business (PAN के अनुसार), trade name (अगर अलग है), business commencement date, और business type (proprietorship, partnership, company, LLP, etc.)।
Principal Place of Business tab में: अपना business address fill करें और ऊपर बताए गए address proof documents upload करें।
Promoters/Partners tab में: अपनी personal information, PAN, Aadhaar details भरें और photograph upload करें।
Authorised Signatory tab में: अगर आप sole proprietor हैं तो आप खुद ही authorized signatory हैं। यही details फिर से fill करनी होंगी।
Goods & Services tab में: आप जो main goods या services provide करते हैं उनका HSN code (Harmonized System of Nomenclature) या SAC code (Services Accounting Code) add करें। Software services का SAC code 998314 है। Consulting का 998312 है। Digital marketing का 998366 है।
Bank Account tab में: IFSC code और account number enter करें।
Step 5: Aadhaar Authentication करें
2025 के नए नियमों के अनुसार Aadhaar authentication mandatory है। आपके Aadhaar registered mobile पर OTP आएगा। इसे verify करें। कुछ states में biometric verification भी required हो सकती है, जिसके लिए आपको designated center जाना पड़ सकता है।
Step 6: Application Verify करके Submit करें
सभी details check करें। Sole proprietor के लिए Aadhaar-based OTP verification से काम चल जाता है (DSC की ज़रूरत नहीं)। Companies और LLPs को Digital Signature Certificate (DSC) लगाना होता है।
Submit करने के बाद एक ARN (Application Reference Number) generate होगा। इसे save करें। इसी से आप अपना application status track कर सकते हैं।
Step 7: GSTIN Allotment
Documents complete हों और Aadhaar authentication हो जाए तो GSTIN आमतौर पर 7 working days के भीतर allot हो जाता है। April 2025 की CBIC clarification के अनुसार average turnaround time 7 working days से कम है। GSTIN और GST Registration Certificate (Form GST REG-06) आपकी registered email पर आ जाएगा।
एक important update: GSTN advisory के अनुसार, registration के 30 days के भीतर या पहला GSTR-1 file करने से पहले valid bank account details portal पर update करना ज़रूरी है, वरना registration suspend हो सकता है।
Registration के बाद क्या? Mandatory Compliance Rules
यह वो section है जिसे लोग अक्सर ignore करते हैं और फिर heavy penalties face करते हैं। Registration के बाद real काम शुरू होता है।
कौन से returns file करने होंगे:
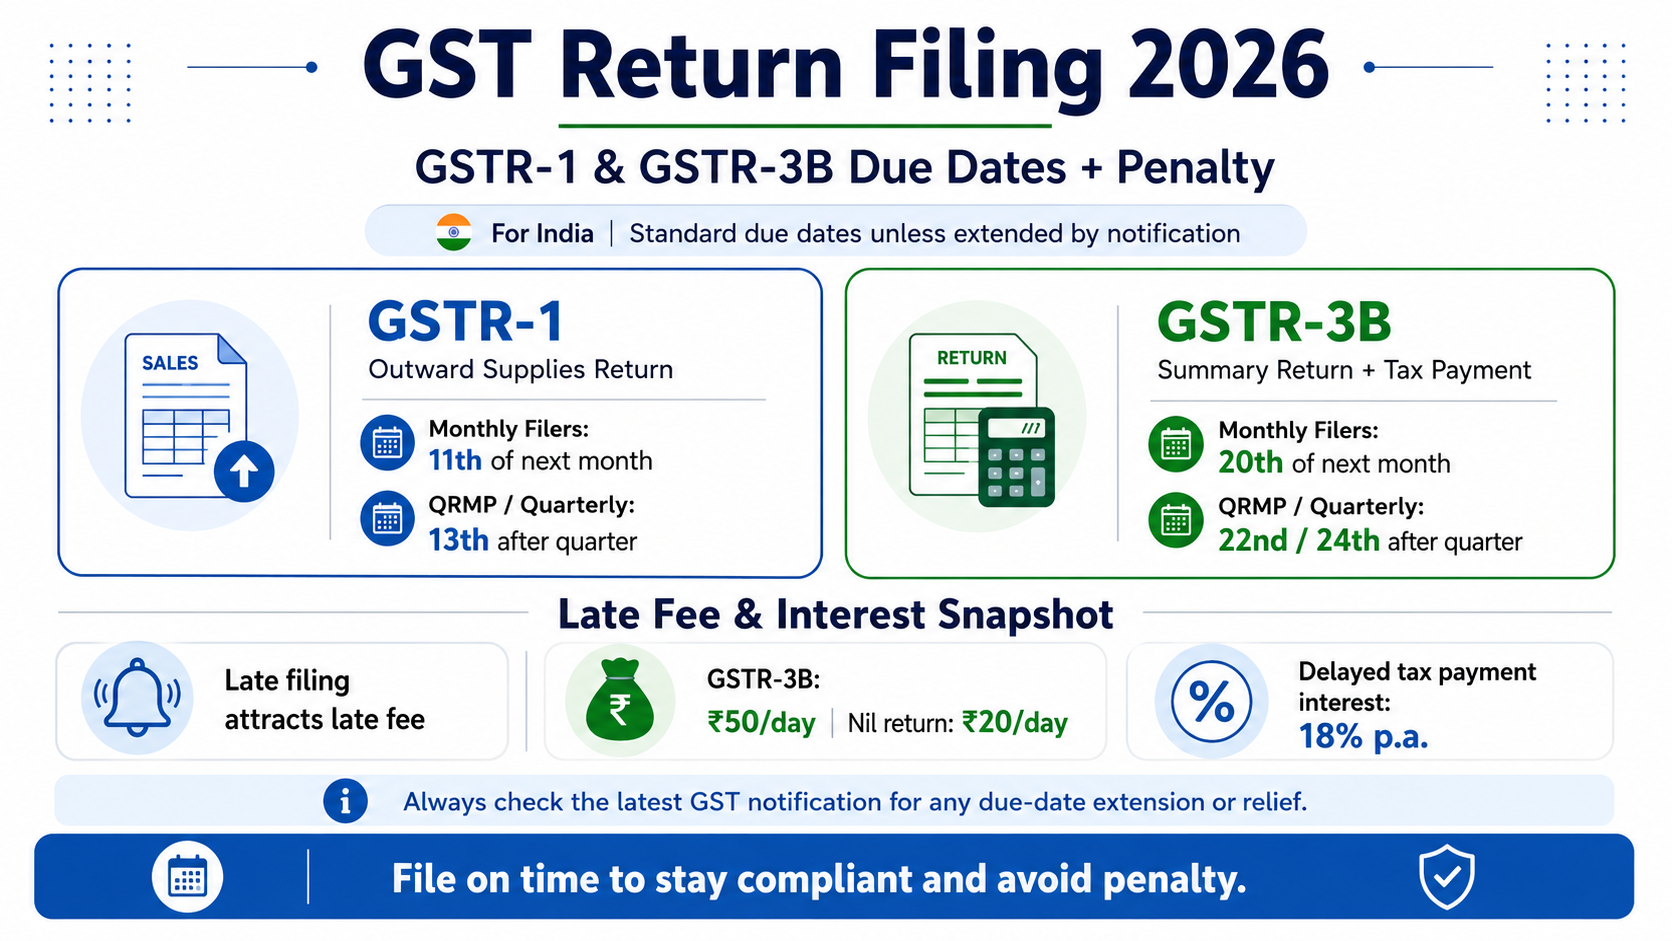
सबसे पहले GSTR-1: यह आपकी outward supplies (sales/invoices) का return है। Monthly filers के लिए due date हर महीने की 11 तारीख है। अगर आपका turnover ₹5 crore से कम है तो आप QRMP scheme choose कर सकते हैं जिसमें quarterly filing होती है।
दूसरा GSTR-3B: यह summary return है जिसमें GST liability pay होती है। Monthly filers के लिए due date हर महीने की 20 तारीख है। यह सबसे important return है।
Late filing की consequences:
यहाँ एक बात clearly समझ लें। GST authorities 2025 में बहुत strict हो गई हैं।
GSTR-1 और GSTR-3B देर से file करने पर late fee ₹50 per day (₹25 CGST + ₹25 SGST) लगती है, जो maximum ₹5,000 तक जा सकती है। लेकिन late fee के अलावा बकाया tax पर 18% per annum interest भी लगता है।
और ज़्यादा serious बात: May 2025 की actual cases में देखा गया है कि कुछ states में GST officers Section 125 invoke करके सिर्फ एक दिन की late filing पर भी ₹50,000 का penalty notice भेज रहे हैं। एक taxpayer को महज दो months की late GSTR-3B filing के लिए ₹1 लाख का penalty notice मिला।
अगर लगातार दो periods की GSTR-3B pending हो तो portal पर e-way bill generation block हो जाती है। यानी goods की movement रुक जाती है।
Tax Invoice के बारे में:
Registration के बाद जो भी invoice बनाएं उसमें GSTIN, HSN/SAC code, GST rate, CGST/SGST या IGST amount separately दिखाना ज़रूरी है। यह GST Rules के Rule 46 का requirement है।
Input Tax Credit (ITC) कैसे काम करता है:
मान लीजिए आपने अपने business के लिए ₹60,000 का laptop खरीदा और उस पर 18% GST यानी ₹10,800 pay किया। अब आप उस ₹10,800 को अपनी GST liability से offset कर सकते हैं। इसे ITC कहते हैं। यह GST registration का सबसे बड़ा financial benefit है।
लेकिन ITC तभी मिलेगा जब vendor ने GSTR-1 में वो invoice report किया हो और आपके GSTR-2B में वो दिखे। इसलिए vendors से हमेशा GST-compliant invoices लें।
Software agency founders और freelancers के लिए special note:
अगर आप foreign clients को services export करते हैं, जैसे Upwork, Fiverr, या direct client से payment आती है, तो आपको annually Letter of Undertaking (LUT) file करनी होती है। LUT file करने पर आप बिना GST charge किए export कर सकते हैं, और जो GST आपने business expenses पर pay किया उसका refund claim कर सकते हैं। यह exporters के लिए बहुत important है।
Common Mistakes जो Application Reject करा देती हैं
कुछ ऐसी गलतियाँ हैं जो बार-बार होती हैं और application में delay या rejection का कारण बनती हैं।
पहली, PAN और Aadhaar में नाम का mismatch। Portal पर name exactly PAN के अनुसार होना चाहिए। अगर PAN पर "Rajesh Kumar" है और आप "Rajesh K" लिखते हैं तो error आएगा।
दूसरी, bank account का नाम business/personal PAN नाम से अलग होना। Cancelled cheque या bank statement पर जो नाम है वो PAN नाम से match होना चाहिए।
तीसरी, documents का size 100 KB से ज़्यादा होना। Portal strict है। compress करके upload करें।
चौथी, address proof में inconsistency। अगर आप घर से काम करते हैं और utility bill किसी और के नाम पर है, तो self-declaration letter साथ attach करें। April 2025 की CBIC instructions के अनुसार, officers को unnecessary documents माँगने से मना किया गया है, जैसे lessor का PAN या Aadhaar। अगर officer ऐसा करे तो आप politely CBIC instruction का reference दे सकते हैं।
पाँचवीं, inactive Aadhaar-linked mobile number। OTP इसी पर आएगा। पहले check करें कि number active है।
FAQ Section
Q1: क्या GST Registration करने में कोई government fee लगती है? नहीं, बिल्कुल नहीं। भारत सरकार GST registration के लिए कोई fee नहीं लेती। gst.gov.in पर apply करना पूरी तरह free है। Agent या CA hire करना optional है, mandatory नहीं।
Q2: Freelancer को GST registration कब लेनी चाहिए? Services provide करने वाले freelancers के लिए annual turnover ₹20 लाख से ज़्यादा होने पर registration mandatory है। ₹20 लाख से कम पर भी voluntary registration कर सकते हैं अगर B2B clients के साथ काम करना हो, ITC claim करना हो, या foreign clients को invoice देनी हो।
Q3: GSTIN मिलने में कितना time लगता है? Documents complete हों और Aadhaar authentication smooth हो तो GSTIN 7 working days के भीतर मिल जाता है। Delays usually incomplete documents या OTP authentication failures की वजह से होती हैं।
Q4: अगर मेरा turnover ₹20 लाख से कम है तो GST registration लेने का क्या फायदा? Business expenses पर ITC claim कर सकते हैं, B2B clients को GST invoice दे सकते हैं, foreign clients को export services पर refund claim कर सकते हैं, और corporate clients के साथ deal करने की eligibility मिलती है। लेकिन ध्यान रखें कि voluntary registration के बाद return filing की सभी obligations apply होती हैं।
Q5: GST return late file करने पर कितनी penalty लगती है? GSTR-1 और GSTR-3B late filing पर ₹50 per day late fee लगती है (maximum ₹5,000 per return)। इसके अलावा बकाया tax पर 18% annual interest लगता है। 2025 में authorities ने Section 125 के तहत सिर्फ एक दिन की late filing पर भी ₹50,000 तक penalty notice भेजे हैं।
Q6: Home-based business का address proof क्या चलेगा? घर से business करने पर आप अपने घर का address ही business address दे सकते हैं। Proof के तौर पर utility bill (electricity/gas) जो आपके नाम पर हो, या property document submit करें। अगर utility bill किसी और family member के नाम पर है तो self-declaration letter और उनके नाम का utility bill साथ दें।
Q7: Sole Proprietor को DSC (Digital Signature Certificate) लगाना पड़ेगा? नहीं। Sole proprietors के लिए Aadhaar-based OTP verification से काम चल जाता है। DSC mainly companies और LLPs के लिए required होता है।
Q8: Rent agreement नहीं है तो क्या करें? अगर आपका रेंट agreement अभी नहीं बना है, तो landlord से एक simple NOC (No Objection Certificate) letter लें जिसमें वो confirm करें कि आप उनकी property से business operate कर रहे हैं। यह letter notarized हो तो और बेहतर है। इसके साथ premises का electricity bill भी attach करें।
निष्कर्ष: एक बार करो, सही करो
GST registration एक ऐसा काम है जो अगर सही documents के साथ, ध्यान से, और एक बार में ठीक से कर लो, तो 7 दिन में हो जाता है। फिर business professionally चलता है।
जो लोग registration avoid करते हैं, वो दो तरफ से नुकसान उठाते हैं। एक तरफ corporate clients से deals miss होती हैं क्योंकि GST invoice नहीं दे सकते। दूसरी तरफ अगर turnover limit cross होने पर registration न करें और authority को पता चले, तो minimum ₹10,000 penalty है।
अभी gst.gov.in खोलें, ऊपर बताए documents तैयार करें, और registration शुरू करें। अगर कहीं कोई step unclear हो तो portal पर ही help section available है, और GST helpline number 1800-103-4786 पर call भी कर सकते हैं।
एक बात और: registration के बाद compliance calendar ज़रूर बनाएं। हर महीने की 11 तारीख GSTR-1 और 20 तारीख GSTR-3B। इन दो dates को याद रखें। बाकी सब manage हो जाता है।
Disclaimer: यह article general जानकारी और educational purpose के लिए है। GST rules, threshold limits, और penalty structures समय के साथ बदल सकते हैं। Specific business situations के लिए किसी qualified CA या tax professional से advice लें। Final decisions से पहले gst.gov.in और CBIC की official notifications ज़रूर देखें।